Dynamic recompilation, while certainly not
a new concept as evidenced by the number of emulators which successfully
employ it, is relatively difficult for many beginners to grasp and
then later successfully implemented. This tutorial is an attempt
by myself to lay down the basics of dynamic recompilation so that
any who look at this tutorial will be able to understand somewhat
how it works.
Dynamic recompilation is the name for an
emulation technique in which programs written for a completely different
CPU architecture (from hereout called the "target architecture")
are decoded and made to run on the current CPU architecture (from
hereout called the "client architecture"). This is done
by decoding individual CPU opcodes for the target architecture CPU
and then translating them into their equivalent opcode or set of
opcodes for the client architecture CPU, of course its a bit more
complex than this, but explaining the specifics of why is beyond
the scope of this tutorial. In order to get the most out of this
technique it is quite necessary for one to have a very decent understanding
of assembly language so that they can choose the most efficient
representation for the client architecture.
Firstly, there are three basic components
of a recompiler, they are as follows:
- The
code generation buffer - this buffer contains
all the binary code generated by the emitters.
- The opcode
emitter functions - these emit various client architecture
opcodes to the code generation buffer.
- The
target architecture opcode translation functions -
these functions translate CPU opcodes into client architecture
opcodes by passing data to the opcode emitter functions.
As you can see these functions form a somewhat
layered architecture, each one relying on the layer before itself,
this relationship can be illustrated by the following image:
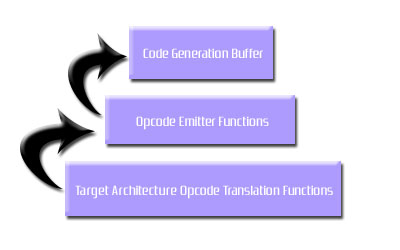
This
creates a sort of "trickle up" architecture. The layer at the top
being the simplest, but also the most vital to the success of the
system. What this should mean to you is that if you cannot allocate
the buffer but your emulator is running in dynamic recompilation mode
then you should throw a fatal error and take the whole system down,
because as with any critical component if it doesn't work then the
system can't function. Now that I've explained the basic workings
of a dynamic recompiler to you, its time that you check out some source
code containing the basic implementation details of a dynamic recompiler
class. Firstly though I'd like to explain that this tutorial will
only be covering the code generation buffer
and opcode emitter function components of
a dynamic recompiler, the last part is emulator specific and thus
does not belong in a document introducing the topic. Now here is the
source code:
enum ASSEMBLER_HELP_VALUES
{
	SIB    = 4,  ///< SIB Value Passed To SibSB
	DISP32 = 5   ///< DISP32 Value Passed To ModRM
};

typedef enum
{
	EAX = 0,
	EBX = 3,
	ECX = 1,
	EDX = 2,
	ESI = 6,
	EDI = 7,
	EBP = 5,
	ESP = 4
} X86RegisterType;

///////////////////////////////////////////////////////////////////////////////////////////////////

class X86Emitter
{
public:
	////////////////////////////////////////////////////////////////////////////////////////////////
	// Constructors

	/** The default constructor.
	  */
	X86Emitter(unsigned long bufferSize = 256);

	////////////////////////////////////////////////////////////////////////////////////////////////
	// Destructors

	/** The default destructor.
	  */
	~X86Emitter();

	////////////////////////////////////////////////////////////////////////////////////////////////
	// Block Execution

	/** This function will execute the block in memory.
	  */
	void ExecuteBlock();

	////////////////////////////////////////////////////////////////////////////////////////////////
	// Move Opcode Emitters

	/** Move 16 bits of data from memory into an x86 CPU register.
	  */
	void Mov16RtoM(unsigned int to, X86RegisterType from);
	/** Move 16 bits of data from an x86 CPU register to memory.
	  */
	void Mov16MtoR(X86RegisterType to, unsigned int from);

	////////////////////////////////////////////////////////////////////////////////////////////////
	// Add Opcode Emitters

	/** Adds an immediate value to an x86 CPU register.
	  */
	void Add32ItoR(X86RegisterType to, unsigned int from);

	////////////////////////////////////////////////////////////////////////////////////////////////
	// Return Opcode Emitter

	/** This opcode must end every recompiled block.
	  */
	void Ret();
protected:
	////////////////////////////////////////////////////////////////////////////////////////////////
	// Emitter Functions

	/** Emits 8 bits of data to our code generation buffer.
	  */
	void EmitByte(unsigned char byte);
	/** Emits 16 bits of data to our code generation buffer.
	  */
	void EmitWord(unsigned short word);
	/** Emits 32 bits of data to our code generation buffer.
	  */
	void EmitDword(unsigned long dword);

	////////////////////////////////////////////////////////////////////////////////////////////////
	// Emitter Modifier Functions

	/** standard opcode emitter helper.
	  */
	void ModRM(unsigned char mod, unsigned char rm, X86RegisterType register);
	/** standard opcode emitter helper.
	  */
	void SibSB(unsigned char sib, unsigned char rm, unsigned char index);

	////////////////////////////////////////////////////////////////////////////////////////////////
	// Variables

	unsigned char* mBuffer;        ///< The pointer to the allocated code generation buffer.
	unsigned long  mBufferSize;    ///< The size of the buffer in bytes.
	unsigned long  mBufferPointer; ///< The current index into the allocated buffer.
};
|
As
you can no doubt tell writing a dynamic recompiler, even a simple
one like the one we're creating takes alot of work. This is
a class that is basic enough to allow us to write values to
a CPU register and add to them then read them back, but even
this requires a hefty amount of code. In the constructor of
our class we will be allocating our code generation
buffer, the default size for this buffer will
be 256 bytes, this should be enough to encapsulate everything
that we will need for our simple demo.
Our simple demo should result in output similar to the following:
Moving value 14 to register EAX...
Adding value 14 to register EAX...
Expected Result :: 28
Result Found :: 28 |
This
is about as simple as dynamic recompilation programs will ever get.
This program is merely designed to test our dynamic recompiler implementation
and to ensure that we don't have any nasty errors hanging about
in the basics of our dynamic recompiler. All the names of the functions
for our class should be familiar to you if you've met the prerequisite
of being familiar with assembly language, as they are very standard
assembly language functions. For those who don't know though, the
MOV opcode on x86 CPUs moves a value into one of the CPU registers
(i.e. EAX, EBX, ECX, etc..) and the ADD opcode on x86 CPUs adds
an immediate value to one of the CPU registers, an immediate value
being one not read from memory or another register. All the implementation
details of these opcodes, including the emitted hexcode values I
found in two documents (The
Nasm Manual and Intel
P4 Processor Manuals). Basically implementing opcodes requires
research and accuracy, and it can often be a slow and somewhat boring
process. Since I'm writing this tutorial though I've done the hard
work for you, so here's the implementation for of this simple emitter
class:
X86Emitter::X86Emitter(unsigned long bufferSize)
: mBuffer( NULL ),
  mBufferSize( bufferSize ),
  mBufferPointer( 0 ),
{
	mBuffer = new unsigned char[bufferSize];
}

///////////////////////////////////////////////////////////////////////////////////////////////////

X86Emitter::~X86Emitter()
{
	if(mBuffer != NULL)
	{
		delete [] mBuffer;
		mBuffer = NULL;
	}
}

///////////////////////////////////////////////////////////////////////////////////////////////////

void X86Emitter::ExecuteBlock()
{
	if(mBlockPointer > 0)
	{
		void (*BlockFunction)() = (void(*)())&mBlock;
		BlockFunction();
	}
}

///////////////////////////////////////////////////////////////////////////////////////////////////

void X86Emitter::Mov16RtoM(unsigned int to, X86RegisterType from)
{
	EmitByte( 0x66 );
	EmitByte( 0x89 );
	ModRM(0, from, DISP32);
	EmitDword( from );
}

void X86Emitter::Mov16MtoR(X86RegisterType to, unsigned int from)
{
	EmitByte( 0x66 );
	EmitByte( 0x8B );
	ModRM(0, to, DISP32);
	EmitDword( from );
}

///////////////////////////////////////////////////////////////////////////////////////////////////

void X86Emitter::Add32ItoR(X86RegisterType to, unsigned int from)
{
	if(to == EAX)
	{
		EmitByte( 0x05 );
	} else {
		EmitByte( 0x81 );
		ModRM(3, 0, to);
	}

	EmitDword( from );
}

///////////////////////////////////////////////////////////////////////////////////////////////////

void X86Emitter::Ret()
{
	EmitByte( 0xC3 );
}

///////////////////////////////////////////////////////////////////////////////////////////////////

void X86Emitter::EmitByte(unsigned char byte)
{
	mBuffer[ mBufferPointer++ ] = byte;
}

void X86Emitter::EmitWord(unsigned short word)
{
	*((unsigned short*)(mBuffer + mBufferPointer)) = word;
	mBufferPointer += 2;
}

void X86Emitter::EmitDword(unsigned long dword)
{
	*((unsigned long*)(mBuffer + mBufferPointer)) = dword;
	mBufferPointer += 4;
}

///////////////////////////////////////////////////////////////////////////////////////////////////

void X86Emitter::ModRM(unsigned char mod, unsigned char rm, X86RegisterType register)
{
	EmitByte((mod << 6) | (rm << 4 ) | (register));
}

void X86Emitter::SibSB(unsigned char sib, unsigned char rm, unsigned char index)
{
	EmitByte(sib << 6) | (rm << 4) | (index));
}
|
Now,
that wasn't too hard. Hopefully that doesn't look too scary to you,
and if it does maybe you should go look it over one more time and
make sure you understand what's going on. Basically as you can see
the heart of the system revolves around the emitters which simply
write different sized chunks of data to our buffer and increment the
internal buffer pointer. But now that you've got that big nasty class
down, why not write a simple little program to show you what its all
about, we'll do the example program whose output I showed above, and
here it is:
#include "X86Emitter.hpp"
#include <iostream>
using namespace std;

int main(int argc, char** argv)
{
	X86Emitter CodeEmitter;

	// This is the code to do the moving of the value and the adding.
	cout<<"Moving Value 14 To Register EAX..."<<endl;
	CodeEmitter.MovMtoR(EAX, (unsigned int)&value);
	cout<<"Adding Value 14 To Register EAX..."<<endl;
	CodeEmitter.AddItoR(EAX, value);
	cout<<"Expected Result :: 28"<<endl;

	// Now we move the value back into our variable.
	CodeEmitter.Mov16RtoM((unsigned int)&value, EAX);
	CodeEmitter.Ret();

	// Now We Run Our Program And Check The Output.
	CodeEmitter.ExecuteBlock();

	cout<<"Result Found :: "<< value <<endl;
	return EXIT_SUCCESS;
}
|
If
everthing went well then we should get the output shown above. If
something went wrong then its probably time to go back and debug.
Anyway, I hope that I have made the topic of dynamic recompilation
at least a little less scary through this tutorial, and hopefully
I have show you that, while its not simple to make one, they aren't
necessarily that difficult either.
Credits:
I give major
credits for this document to GoldFinger the author of GoldRec, some
of the source code in here is borrowed from his dynamic recompiler
which I think is an excellent one, and certainly something to look
out for.
|